Search

Search this blog:

Search This Blog

Outlook Conditional Formatting (for BCC emails)


I've received a few emails in the past month where I was BCC'd into them and didn't realize. This can be embarrassing when you start talking about one of those emails to the person it was sent to, as they won't realize you were in on it too!

Outlook View Settings

Outlook View Settings is a powerful way to setup your Outlook to work for you. In the View tab in the Outlook ribbon, click "View Settings" to open this dialog box below:


screenshot Outlook advanced view settings


Note I have don this from my inbox, so will be formatting how my inbox looks. Today we want to highlight emails where I'm only in the BCC, so click the 'Conditional Formatting' button. This will pull up a window of all the different formatting changes Outlook makes for us automatically, such as highlighting unread emails.

Click the 'Add' button to create a new conditional formatting rule. Name it 'BCC' and click the 'Font' button to choose a format. I've chosen a slightly lighter font to indicate that these emails may be FYI or less urgent, and probably don't require an action on my part.

screenshot Outlook conditional formatting

Now click the 'Condition' button. This will pull up yet another dialog box. Here we have three tabs - click the 'Advanced' tab. At the bottom of this window you'll see a 'Field' button.

Click 'Field' and select 'All Mail Fields' and find and click the 'To' field.

screenshot Outlook Advanced Filter


For the condition, select 'doesn't contain' and type your name (as it appears in your inbox) in the 'Value' box:
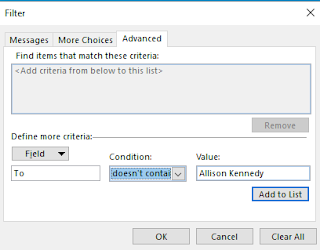
screenshot Outlook Advanced Filter

Click the 'Add to list' button to add this to the top window.

Repeat the same steps for the 'CC' field, 

screenshot Outlook Advanced Filter


then click 'Add to List'. 

You should now have two criteria in the box on top. Click 'Ok' three times (on the Filter window, the conditional formatting window, and the Advanced View Settings window). 

Send yourself a test email where your name is in the BCC box and see what happens - it should have the formatting you selected.

Remove Duplicates - Power Query vs Data Model


Today's post is going to highlight some of the differences in how Power Query and the Data Model handle duplicate or distinct values, particularly when it comes to case sensitivity and messy data. 

While this isn't a common issue with database source data, many of us use Excel or other less reliable data sources where this might be a potential issue. I've had a few questions around this issue, the most recent being one from @Ana2022 in the Power BI Community.

Case Sensitivity in Power Query

Consider the below table, with two distinct names:

  • ACE
  • Excel with Allison


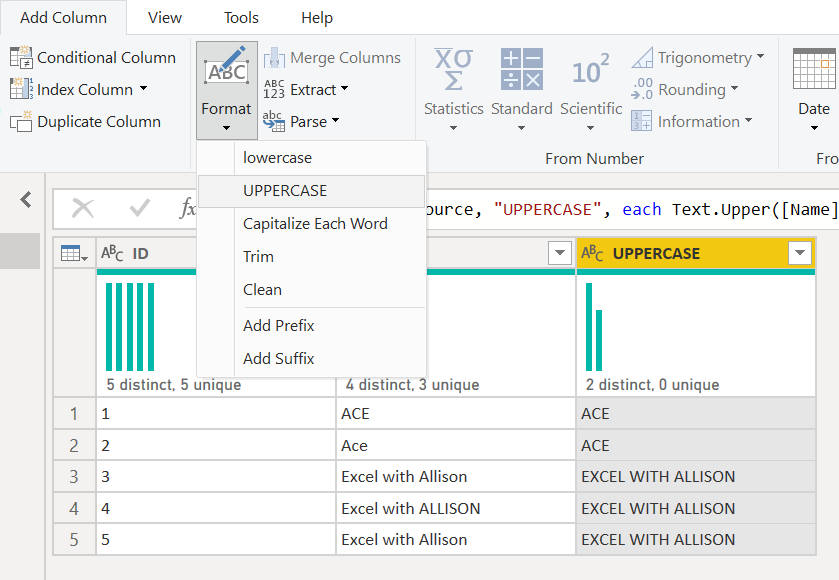
These names are split across 5 rows, with some duplicates. Note they also are written with different combinations of uppercase and lowercase letters. I know that 'Excel with Allison' is the same as 'Excel with ALLISON', and ACE is the same as Ace.

IMPORTANT: We will prove in this post that if ACE is a different company to Ace, then you will need to create a unique ID that does not depend on case sensitivity.

Remove Duplicates

Let's start by doing a remove duplicates on the Name column: 

Power Query returns 4 distinct values - but we know there are only 2 distinct values.

Load to Data Model

Ok, let's try loading this data to the Data Model (Close & Apply in Power BI or Close & Load to in Excel). 

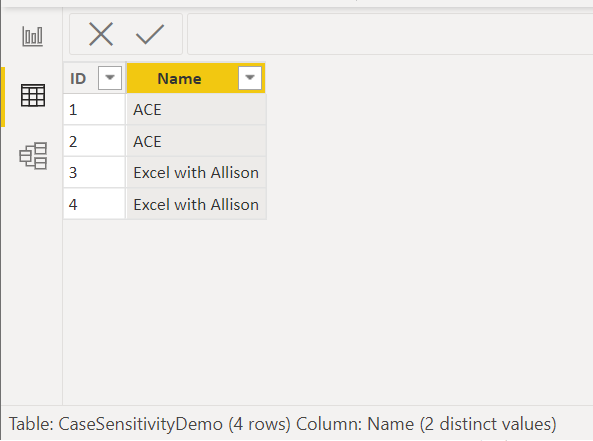
Interestingly, we note that the Data view counts a total of 4 rows and only 2 distinct values. Note also that Ace with ID 2 has been loaded as ACE and Excel with ALLISON with ID 4 has been loaded as Excel with Allison. 

So, there is no case sensitivity in the data model. When we load data, Power BI takes the uppercase/lowercase of the first value it loads and applies that to all subsequent values. 

This makes many things very difficult (among them are Sort by Columns, 1 to many relationships, and distinct counts). 

To overcome this difference, we can choose a case in Power Query and apply that before removing duplicates. 

UPPERCASE all values

I want ACE to be all uppercase and Excel with Allison to be proper case. I like the values that were loaded previously, so the order they're in works well. That means I don't want to transform the existing name column to all UPPERCASE, because I'll ruin the Excel with Allison. 

So, we'll add a new column: 


Now I will remove duplicates on the UPPERCASE column;


This leaves us with exactly 2 distinct values as we expected, and when we load these into the Data Model they will all be unique. 

If we want, we can remove the UPPERCASE column, as it's not needed anymore. 


Trim Text - Spaces in Power Query

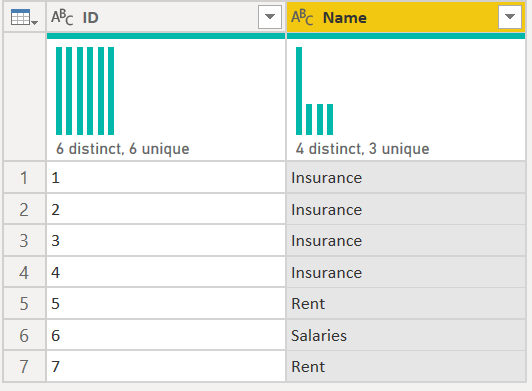
Another common problem we see with Remove Duplicates occurs when there are invisible characters after the text value. Take for example this table, which appears to only have three distinct values:  "Insurance", "Rent" and "Salaries" but Power Query says it has 4 distinct values:


In the View tab, turn on Value Distribution. Select the Name column and we can see where the problem is:

Insurance is listed twice in this bar graph, so it must have the multiple distinct values.

Now that we know "Insurance" is the problem, we'll go back to our original table. If we do a filter and search for Insurance, then look at the code in the formula bar, we'll be able to see what values it's chosen to filter for: 

Here we can see that it is searching for [Name] = "Insurance" or [Name] = "Insurance   " so there are spaces after Insurance in some rows.

To remove the spaces, we can use a TRIM function: 


Now we're left with three distinct values as we expected, and this is the same thing that loads into the Data Model.

Conclusion

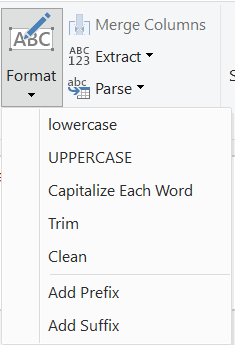
The Power Query functions located in the Transform > Format button in the ribbon can be vital in the process of getting a unique list of values for use in the data model.


Setup Outlook Rules to Reduce Spam in your Inbox


 This post is inspired by an email I got last week that turned into over a spam dozen emails simply because the sender of the email did not change the 'Reply To' field.

Most of my students are fairly good about using the 'Reply All' option sparingly in Outlook. However, with the increased use of Microsoft Teams and Office 365 Groups, I'm seeing a lot more email trails sent to large distribution groups. A simple 'Reply' will send an email to everyone in the group - same damage as hitting 'Reply All'. 

So how can we avoid getting spam from distribution lists?

Sender Action: Change Reply To in Email Options

If you're the owner of a distribution list, whenever you send an email from that mailbox, ensure you set the 'Reply to' value to an individual email rather than the entire distribution list.

This can be changed under Email Options when you 'Pop out' the email in Outlook;

Select 'Direct Replies To' in the ribbon:

screenshot Outlook message ribbon

Then type your email in the 'Have replies sent to' box:

screenshot Outlook options

This will automatically update the 'Reply' behavior to put any email(s) you put in that box into the Reply field of an email when recipients hit 'Reply'. If they're observant enough they'll notice. So don't worry, you're not doing anything dodgy.

Recipient Action: Setup Outlook Rules

Unfortunately, we can't always just ask the recipient to setup 'Direct Replies To', so we need to take control of our own Inbox and filter out those junk replies.

Outlook Rules can help manage this:

In the Home tab in the ribbon, select Rules > Manage Rules & Alerts. 

Click New Rule > Create Rule on Messages I receive. 

screenshot Outlook rules

Click Next.

Tick 'To specific people or Group'.

In the bottom pane, click the blue hyperlink to add the email, and type the email for the distribution list.

Click Next to define the action.

Tick 'Stop processing more rules' and 'move it to the specified folder'.

In the bottom pane, click the blue 'specified folder' hyperlink to select a folder. You can move directly to Deleted Items if you're feeling confident, or select / create another folder to store them in.

Click 'Next' again to add exceptions: 

Tick 'except if from people or public group'.

Type the SAME EMAIL as the distribution group you typed in the first screen.

Your rule should look something like this when completed:

screenshot Outlook rules setup

Basically, this will ensure that you receive the original email sent from the distribution list, but all replies to it will be deleted/moved.

Note: This will also delete any emails sent to the distribution list in the first instance, so may not work for all scenarios. 

Custom Visual Review: Charticulator

This is not your ordinary custom visual - this is EVERY custom visual. Charticulator puts the power to design and develop custom visuals to ...